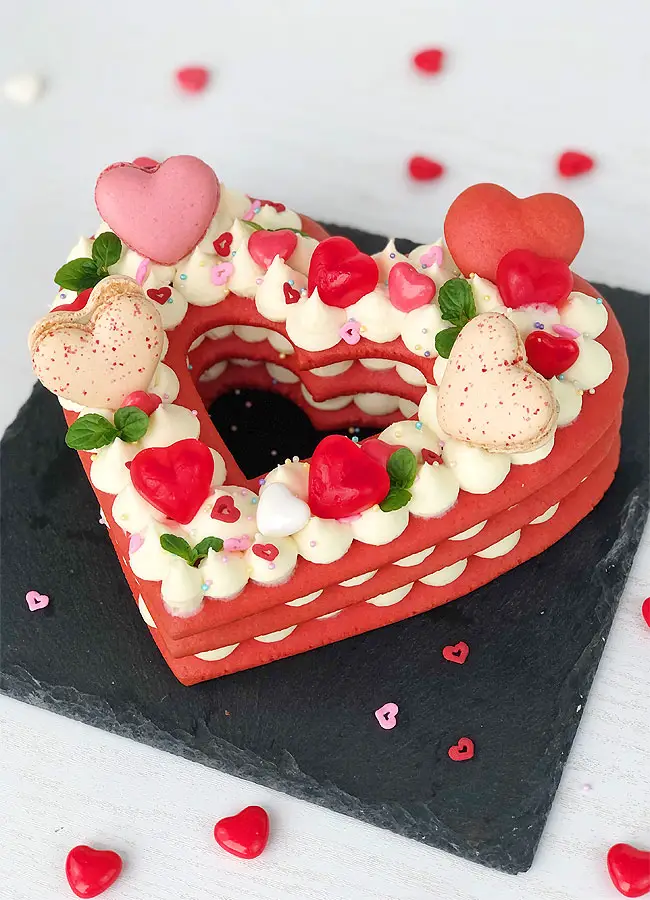
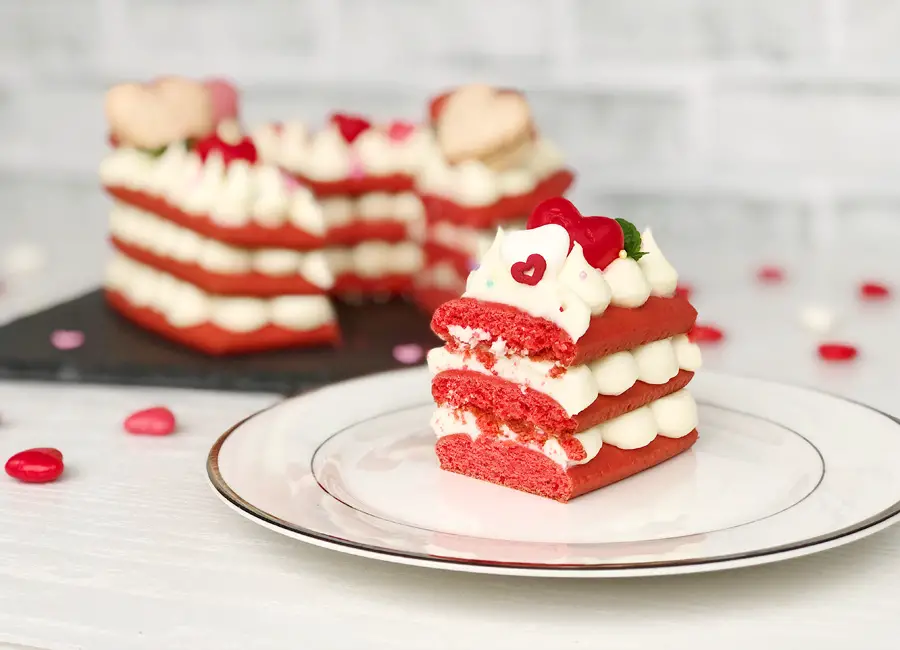
Today I want to show you how to make a Heart Shaped Cookie Cake. This type of cake is also known as Letter Cake, Number Cake or Alphabet Cake which was very popular a couple of years ago. I made a few of them back in a day for Mother’s Day and now I thought it would be nice to make a red version for Valentine’s Day.
Soft honey cookie layers filled with white chocolate Mascarpone frosting and strawberry filling will make a memorable dessert on Valentine’s Day.
Ingredients for the cake:
300-320g sifted flour:
100g sugar
65g butter
65g honey
¼ tsp salt
¾ tsp baking soda
2 eggs
1/2-1 tsp red food coloring
Ingredients for the frosting:
200g white chocolate
200 ml heavy whipping cream
225g Mascarpone cheese
Ingredients for the strawberry filling:
60g strawberries (fresh or frozen)
20g sugar
8g cornstarch
Step 1
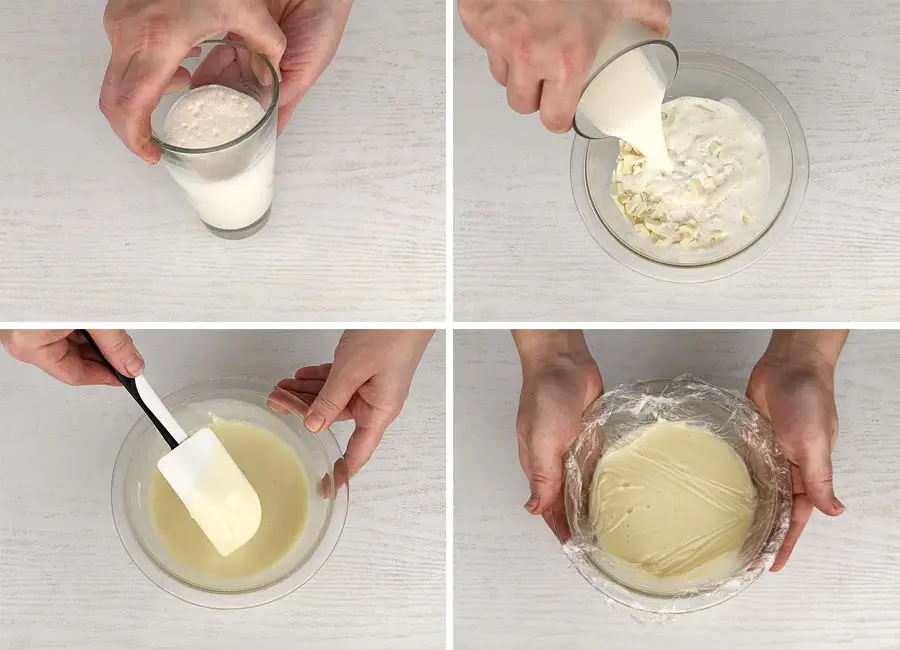
We’ll start by making the frosting because it needs to chill for a few hours for stabilizing. Microwave the heavy whipping cream until it’s almost boiling. Make sure to keep an eye on it so it doesn’t bubble over in the microwave. Pour the hot heavy cream over the chocolate, let it sit for 2 minutes and start whisking slowly until the mixture is smooth and well combined. Cover the ganache with a plastic wrap, lightly pressing the plastic against the surface. Refrigerate for 4-6 hours or overnight.
Step 2
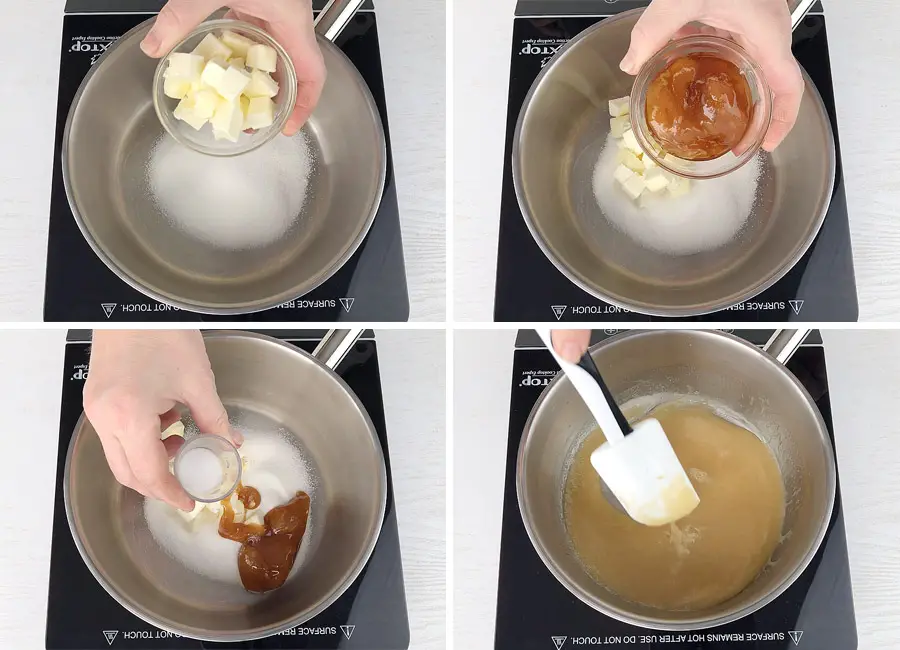
In a heavy bottom saucepan combine the sugar, butter, honey and salt. While constantly whisking, cook over medium heat until all the sugar and butter are dissolved.
Step 3
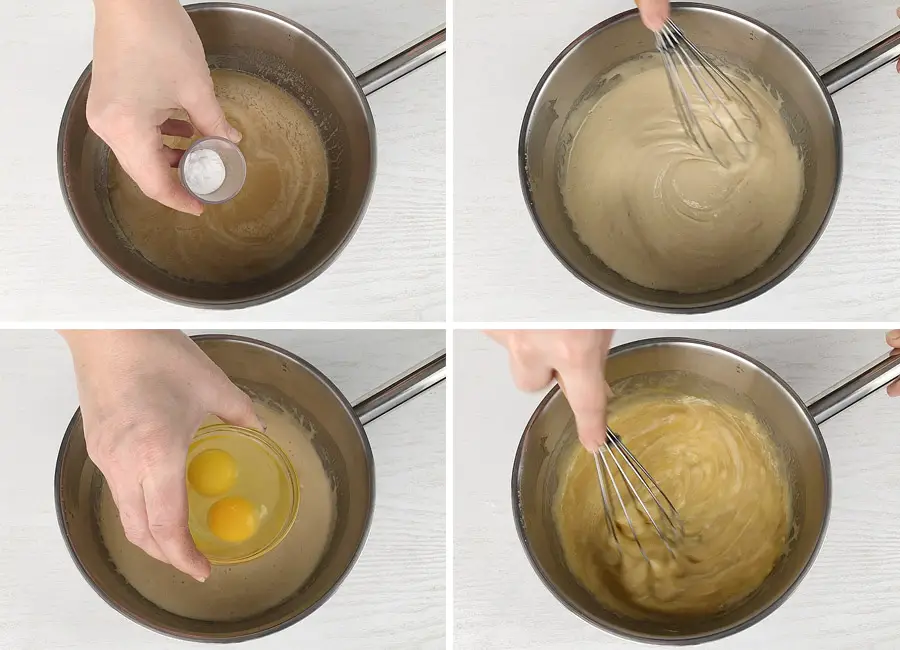
Take the pan off the heat and add the baking soda. Whisk about a minute until all the mixture increase in volume and brighten in color. Add the eggs and whisk again until all are incorporated well.
Step 4
Depends on the brand of your food coloring, add between half a teaspoon to a teaspoon of red food coloring. I use Americolor powdered food coloring, but you can also use gel food coloring. Mix the honey mixture very well and let it cool for about 10 minutes.
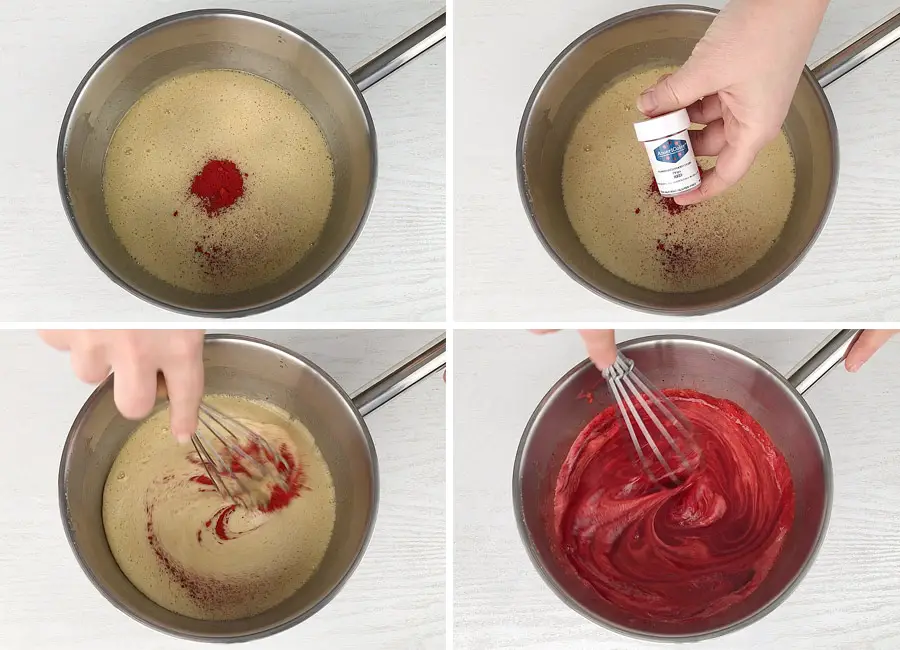
* This step is optional and if you don’t have the red food coloring just skip it.
Step 5
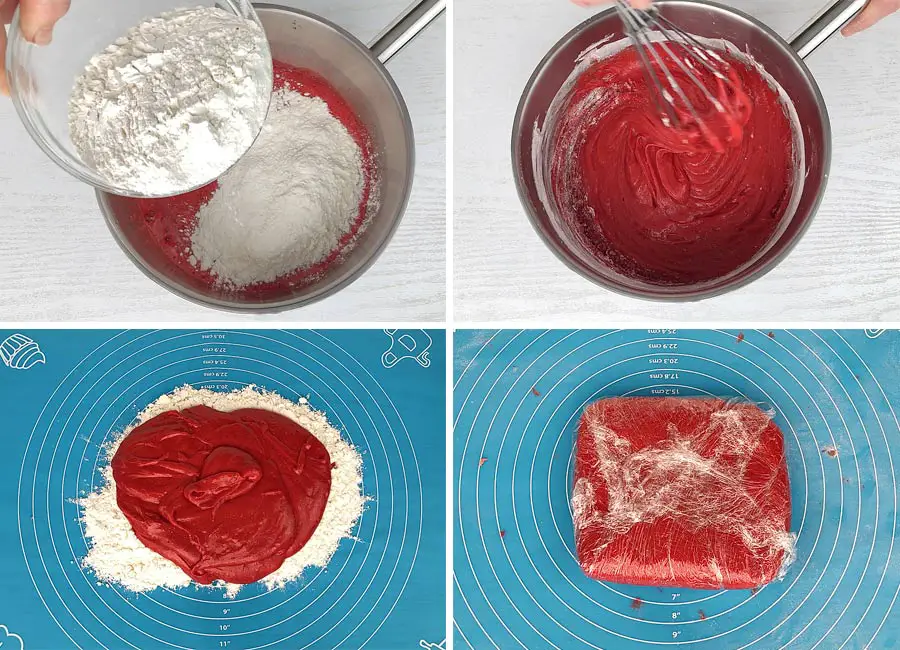
Next, add about half of the flour and start mixing the dough. Spread the rest of the flour on the work surface and pour the dough in the middle. Knead the dough with your hands. If you feel like the dough is too soft and sticky, add 1-2 tablespoons of flour. The dough should turn out soft and if you clean your hands it will not stick to them. Cover the dough with plastic wrap and refrigerate for an hour.
Step 6
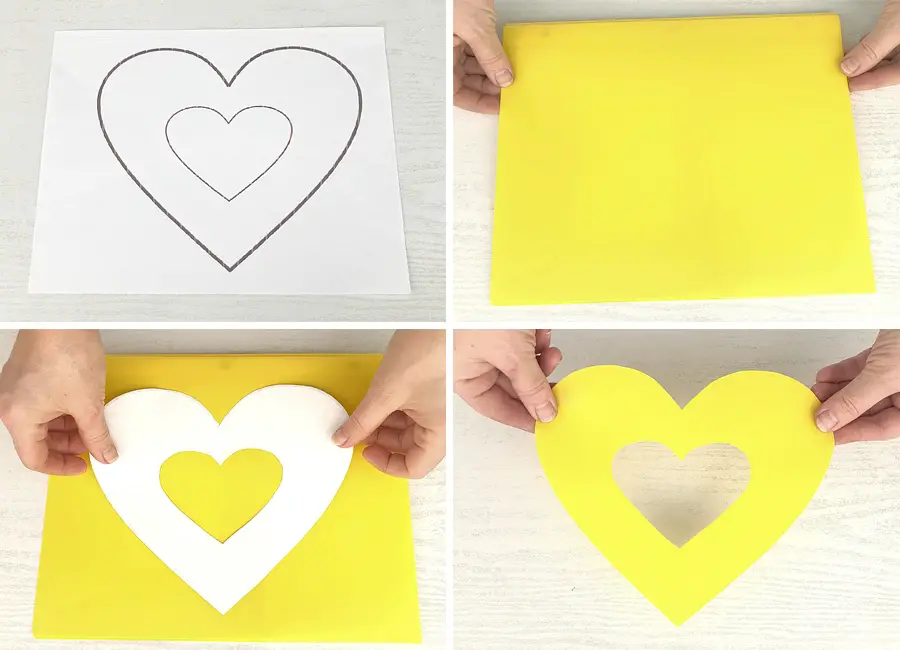
While the dough is chilling let’s prepare the heart template. I will use a heart with a cut in the middle, but you can make a whole heart, or you can make an individual mini heart cake. For your convenience I prepared a printable template here. I will also use this plastic folder to make my template more stable and durable. I printed the heart, outlined it with a pencil and cut it out.
Step 7
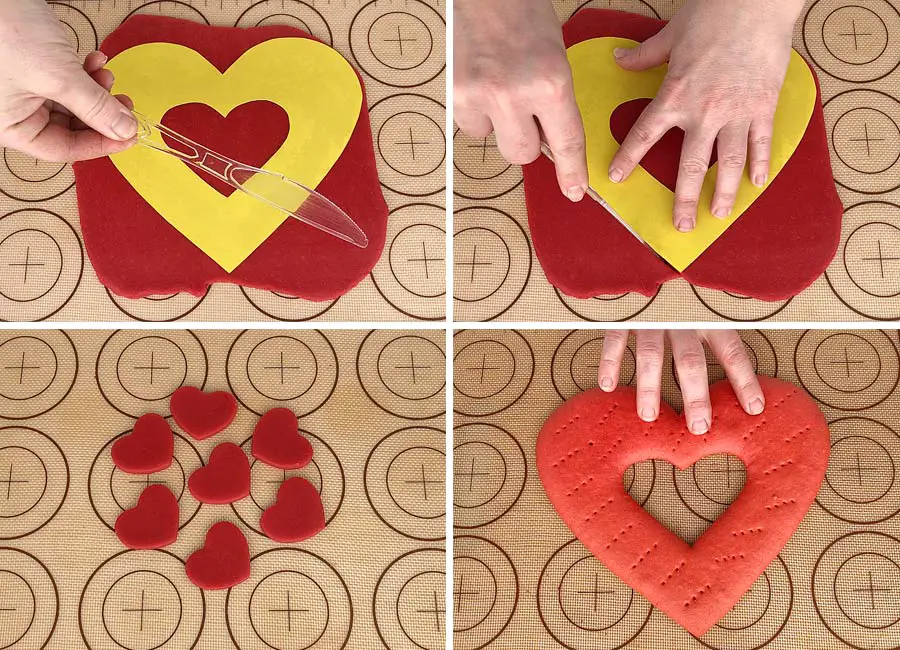
Divide the chilled dough into two pieces and keep one of them refrigerated. Roll out the second piece about a quarter of an inch thick. Place the prepared templet on top of the dough and using a sharp knife cut it out. Remove the template and remaining dough. Using a fork prick some holes all over the cake layer. Transfer the silicone mat onto a baking sheet and bake at 350 degrees Fahrenheits for 7-8 minutes.
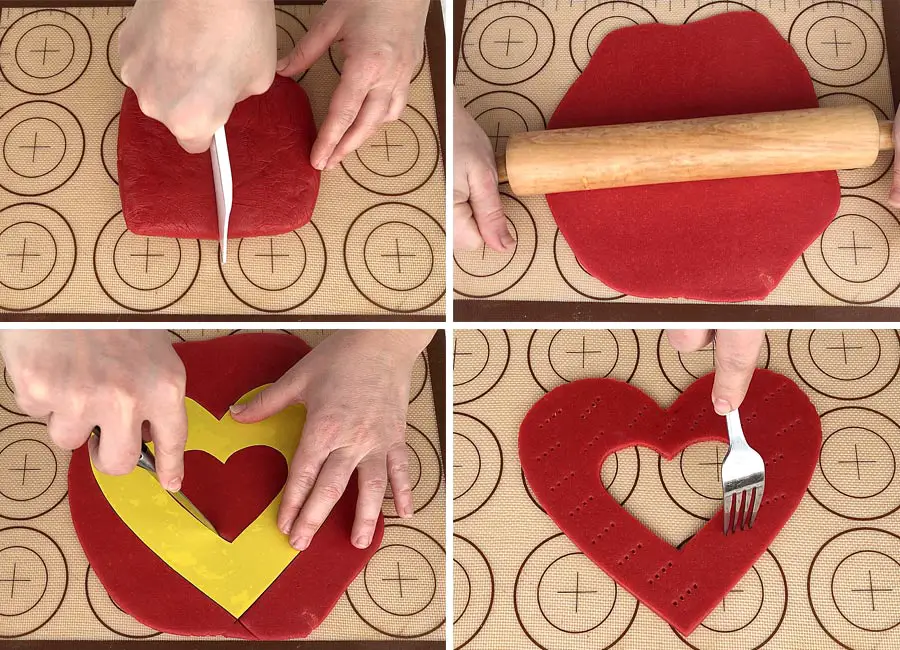
*I want to note that you need to roll out the dough immediately on parchment paper, silicone, or a Teflon sheet which we’ll transfer to a baking sheet and bake. The dough is delicate and will not keep it shape if you try to transfer it after rolling out.
Step 8
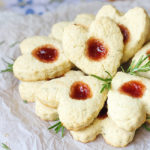
While the first cake layer is baking let’s prepare the second one. Another tip is to use a disposable plastic knife. By using such a knife, the cut is turning out smoother than with a regular knife. Prick some holes and bake the second layer. From the specified amount of dough, I baked three heart layers and from the leftovers I made little hearts cookies.
Step 9
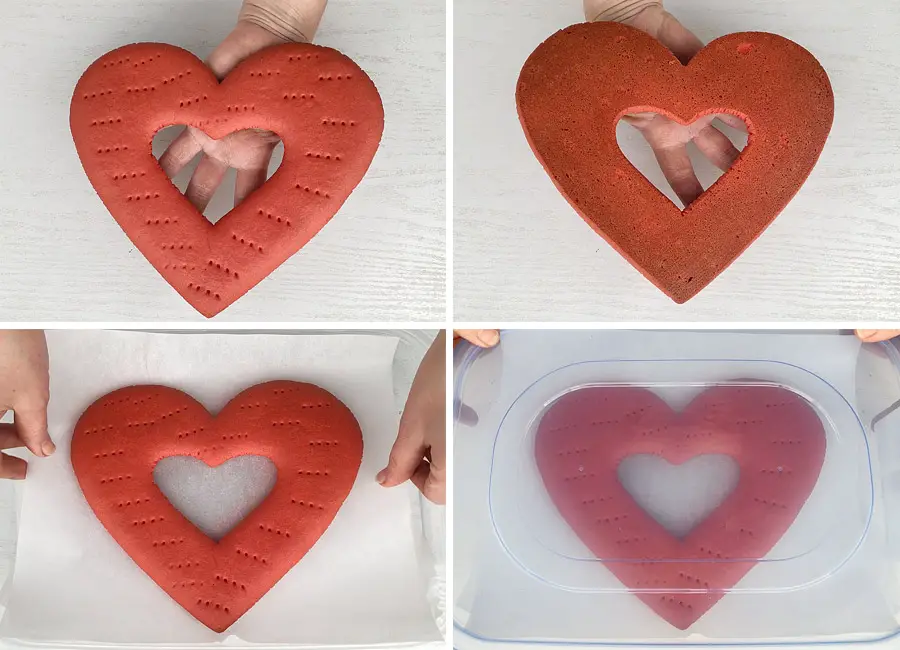
The baked dough should slightly spring when pressed on top and will be slightly browned on the bottom. The cake layers can be baked a few days on advanced and stored in an airtight container between pieces of parchment paper.
Step 10
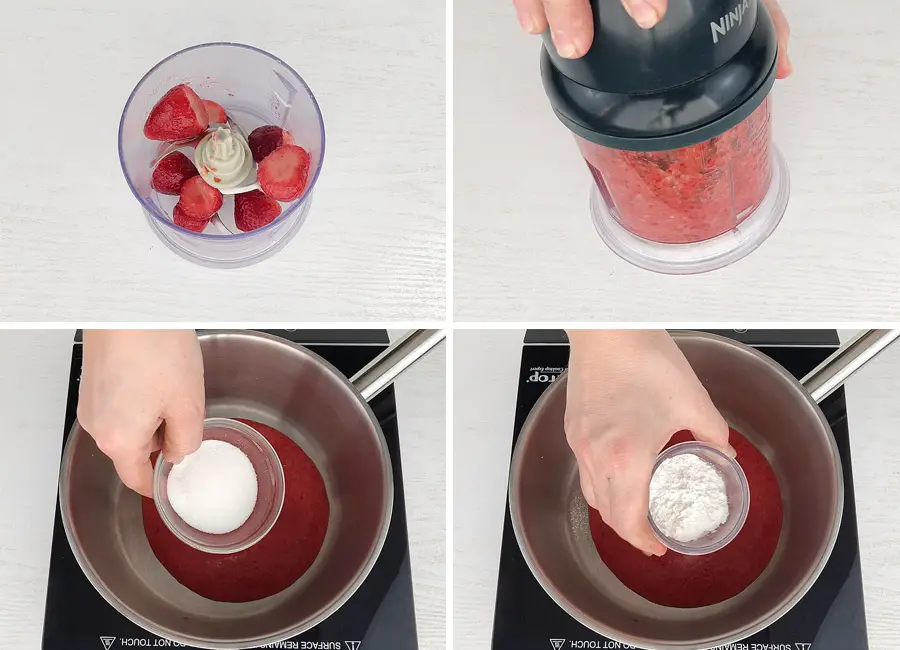
If you wish, you can use a filling in the cake. It can be melted chocolate or store-bought fruit jam. I use frozen strawberries that I previously defrosted and now using a food chopper I will blend them. Transfer the strawberry puree into a saucepan. Add sugar and cornstarch and mix all together until the cornstarch has dissolves.
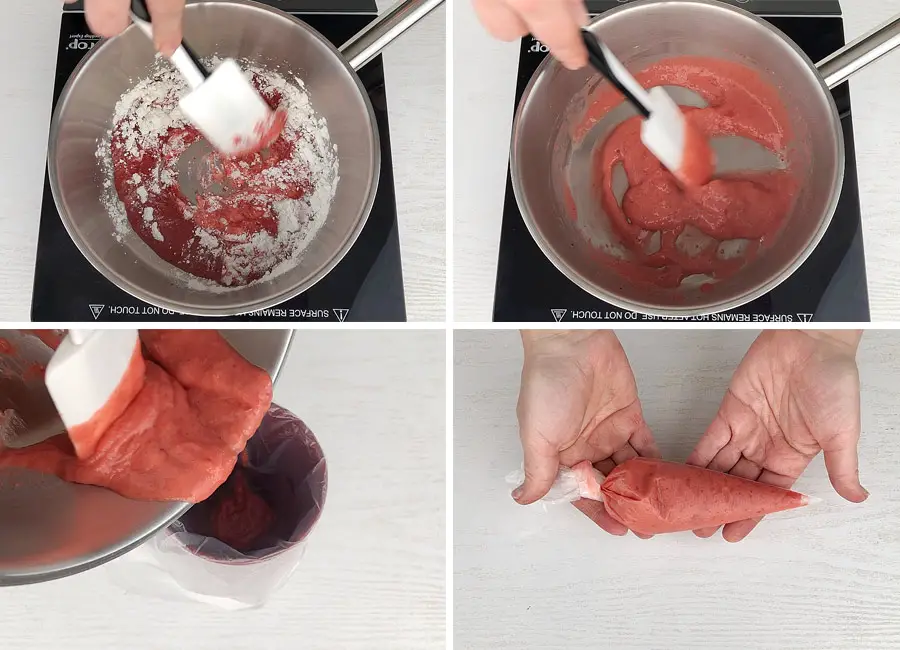
Bring the strawberry mixture to a boil while constantly whisking, reduce the heat and cook for about 2 minutes while whisking. Transfer the strawberry filling into a piping bag and let cool completely.
Step 11
Now we can finish the cake frosting. The white chocolate ganache is chilled overnight and to make it more convenient to whip, I’ll transfer the ganache into a large bowl. Using a hand mixer whip the ganache to soft picks. Be careful to not overbeat the mixture. Add the cold Mascarpone cheese and on the lowest speed of your mixer whisk all the ingredients together for about 15-20 seconds. Transfer the frosting into a pastry bag fitted with an extra-large plain piping tip.
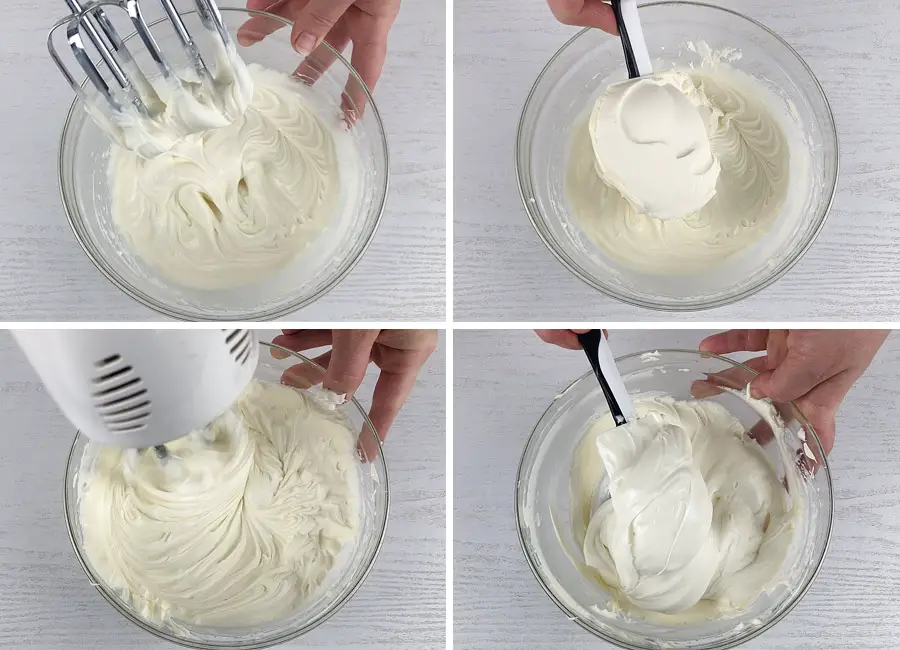
*Remember that Mascarpone cheese is very easy to overbeat.
Step 12
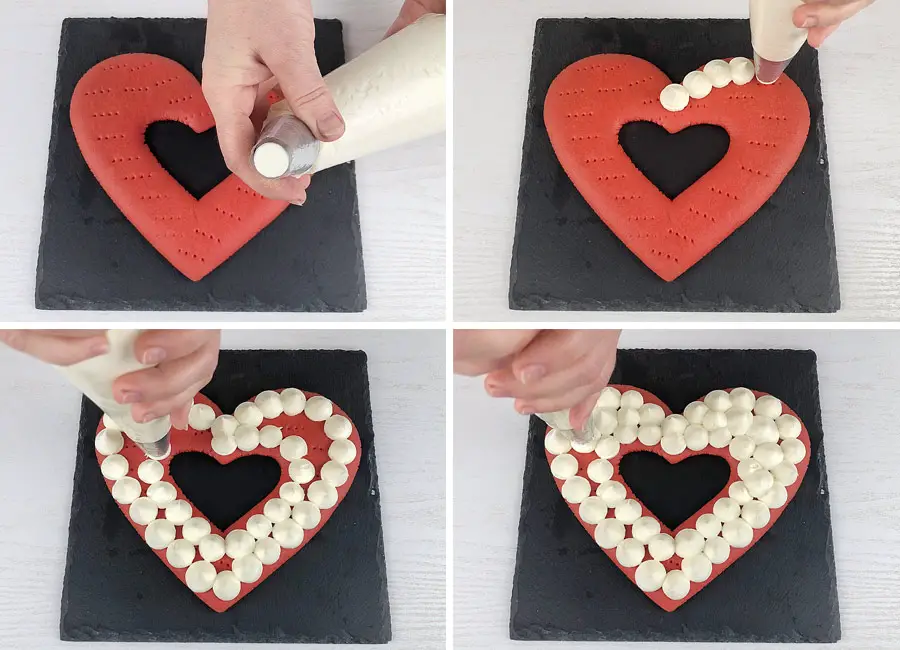
Place the first cake layer on the cake board or on the serving plate and pipe dollops of frosting along the outer contour of the heart. Then pipe dollops of frosting along the inner contour of the heart. And finally fill the empty spaces.
Step 13
Pipe the strawberry filling in between the frosting. Do not pipe too much, so that the filling doesn’t leak out. Carefully place a second layer of cookie heart on top of the first, gently press it down and repeat the frosting pattern. Place the third layer of cookie heart and cover it with the frosting without strawberry filling.
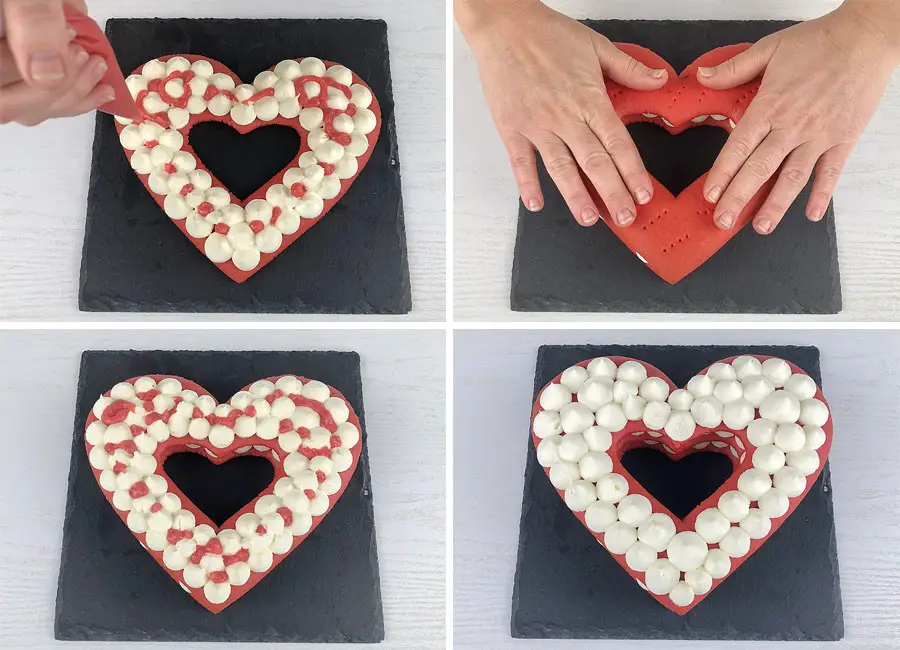
*At this point, I would recommend refrigerating the cake for 2-4 hours in a plastic cake carrier or in a large airtight container, then decorate before serving.
Step 14
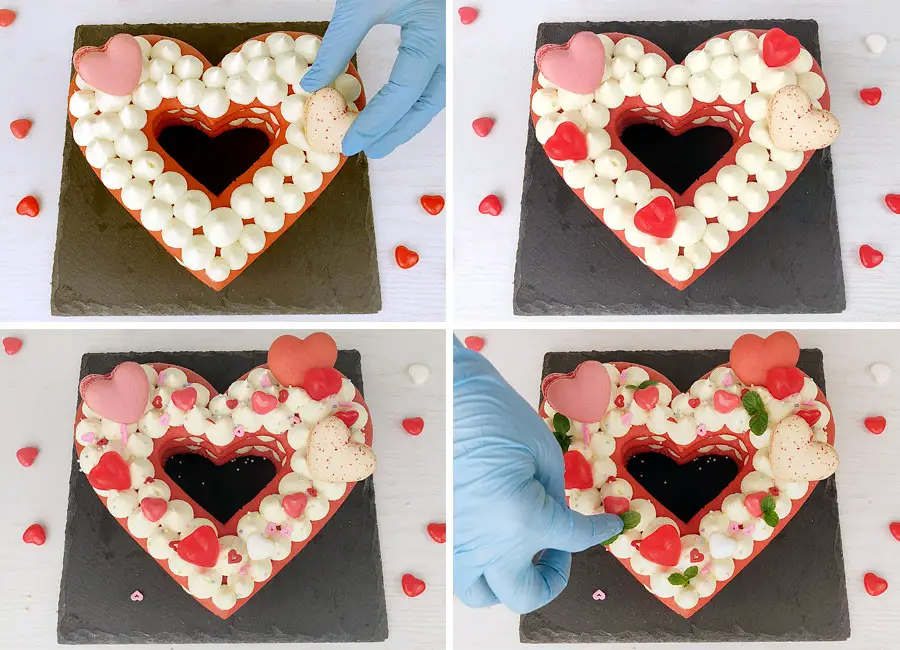
For decoration you can use macarons, meringue cookies, candies, chocolate, fresh berries, sprinkles and fresh mint leaves. You can also pipe buttercream roses or use fresh flowers.
Enjoy!
Notes:
The cookie layers can be made up to two weeks an advance and stored in an airtight container between the pieces of parchment paper.
I use Americolor powdered food coloring, but you can also use gel food coloring. This step is optional and if you don’t have the red food coloring just skip it.
If you’re making whole heart cookie cake, you will need 1.5 portion of white chocolate and Mascarpone frosting.
Fruit filling in the cake is optional. It can be melted chocolate or store-bought fruit jam.
The cake can be stored in the refrigerator for up to 2 days but be aware of the garnishes you choose (flowers can wilt, and sliced fruits can dry out).
This post may contain affiliate sales links. Please see my Full Disclosure Policy for details.

Heart Shaped Cookie Cake
Ingredients
Method
- Microwave the heavy whipping cream until it’s almost boiling. Make sure to keep an eye on it so it doesn’t bubble over in the microwave. Pour the hot heavy cream over the chocolate, let it sit for 2 minutes and start whisking slowly until the mixture is smooth and well combined. Cover the ganache with a plastic wrap, lightly pressing the plastic against the surface. Refrigerate for 4-6 hours or overnight.
- In a heavy bottom saucepan combine the sugar, butter, honey and salt. While constantly whisking, cook over medium heat until all the sugar and butter are dissolved.
- Take the pan off the heat and add the baking soda. Whisk about a minute until all the mixture increase in volume and brighten in color. Add the eggs and whisk again until all are incorporated well.
- Depends on the brand of your food coloring, add between half a teaspoon to a teaspoon of red food coloring. I use Americolor powdered food coloring, but you can also use gel food coloring. Mix the honey mixture very well and let it cool for about 10 minutes.* This step is optional and if you don’t have the red food coloring just skip it.
- Next, add about half of the flour and start mixing the dough. Spread the rest of the flour on the work surface and pour the dough in the middle. Knead the dough with your hands. If you feel like the dough is too soft and sticky, add 1-2 tablespoons of flour. The dough should turn out soft and if you clean your hands it will not stick to them. Cover the dough with plastic wrap and refrigerate for an hour.
- While the dough is chilling let’s prepare the heart template. I will use a heart with a cut in the middle, but you can make a whole heart, or you can make an individual mini heart cake. I will also use this plastic folder to make my template more stable and durable. I printed the heart, outlined it with a pencil and cut it out.
- Divide the chilled dough into two pieces and keep one of them refrigerated. Roll out the second piece about a quarter of an inch thick. Place the prepared template on top of the dough and using a sharp knife cut it out. Remove the template and remaining dough. Using a fork prick some holes all over the cake layer. Transfer the silicone mat onto a baking sheet and bake at 350 degrees Fahrenheits for 7-8 minutes.*I want to note that you need to roll out the dough immediately on parchment paper, silicone, or a Teflon sheet which we’ll transfer to a baking sheet and bake. The dough is delicate and will not keep it shape if you try to transfer it after rolling out.
- While the first cake layer is baking let’s prepare the second one. Another tip is to use a disposable plastic knife. By using such a knife, the cut is turning out smoother than with a regular knife. Prick some holes and bake the second layer.From the specified amount of dough, I baked three heart layers and from the leftovers I made little hearts cookies.
- The baked dough should slightly spring when pressed on top and will be slightly browned on the bottom. The cake layers can be baked a few days on advanced and stored in an airtight container between pieces of parchment paper.
- If you wish, you can use a filling in the cake. It can be melted chocolate or store-bought fruit jam. I use frozen strawberries that I previously defrosted and now using a food chopper I will blend them. Transfer the strawberry puree into a saucepan. Add sugar and cornstarch and mix all together until the cornstarch has dissolves.Bring the strawberry mixture to a boil while constantly whisking, reduce the heat and cook for about 2 minutes while whisking. Transfer the strawberry filling into a piping bag and let cool completely.
- Using a hand mixer whip the ganache to soft picks. Be careful to not overbeat the mixture. Add the cold Mascarpone cheese and on the lowest speed of your mixer whisk all the ingredients together for about 15-20 seconds. Transfer the frosting into a pastry bag fitted with an extra-large plain piping tip.*Remember that Mascarpone cheese is very easy to overbeat.
- Place the first cake layer on the cake board or on the serving plate and pipe dollops of frosting along the outer contour of the heart. Then pipe dollops of frosting along the inner contour of the heart. And finally fill the empty spaces.
- Pipe the strawberry filling in between the frosting. Do not pipe too much, so that the filling doesn’t leak out. Carefully place a second layer of cookie heart on top of the first, gently press it down and repeat the frosting pattern. Place the third layer of cookie heart and cover it with the frosting without strawberry filling.*At this point, I would recommend refrigerating the cake for 2-4 hours in a plastic cake carrier or in a large airtight container, then decorate before serving.
- For decoration you can use macarons, meringue cookies, candies, chocolate, fresh berries, sprinkles and fresh mint leaves. You can also pipe buttercream roses or use fresh flowers.





Leave a Reply